

How to Winterize Boat Engine: A Complete Guide
At its core, winterizing a boat engine means stabilizing the fuel, flushing the cooling system with marine antifreeze, fogging the cylinders, and changing the engine oil. This isn't just busywork—it's the essential process that stops water from freezing and expanding inside critical parts. Skipping this can lead to catastrophic damage, like a cracked engine block, when the temperatures plummet.
The Real Cost of Skipping Engine Winterization
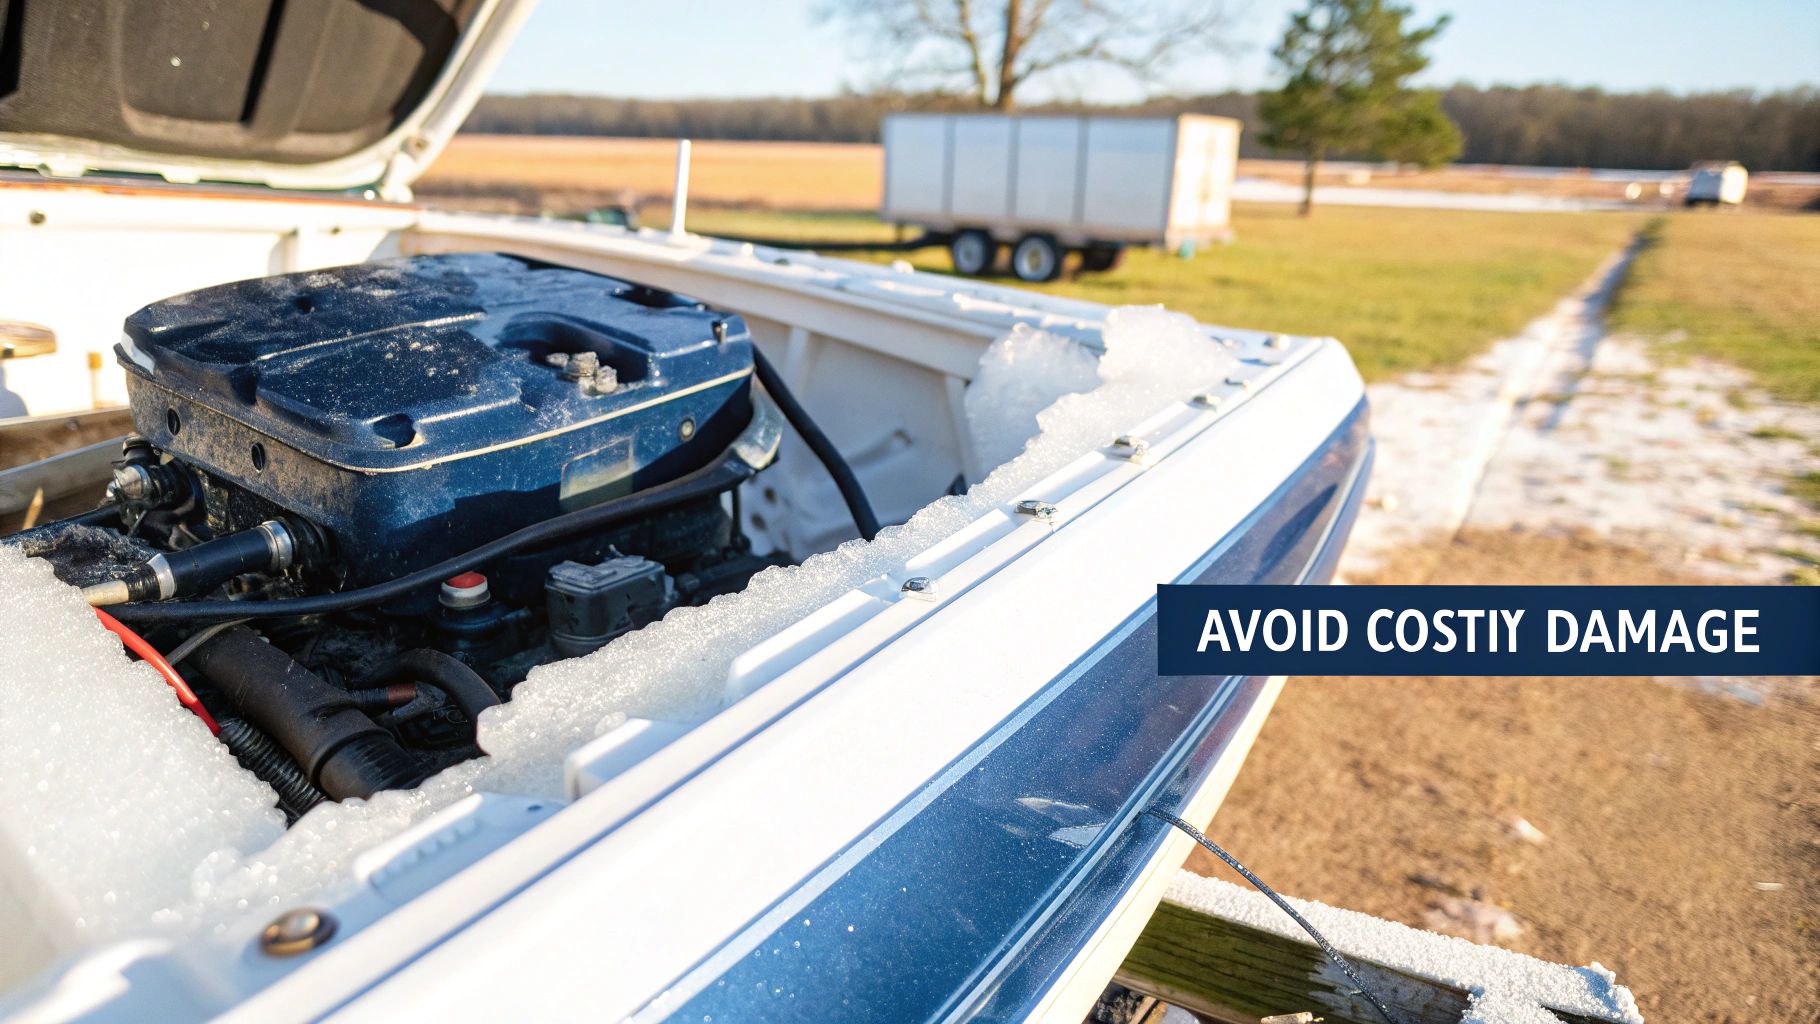
Staring at a frozen, cracked engine block is every boater's worst nightmare. It's also an entirely preventable disaster.
Neglecting to winterize your engine isn't a shortcut; it's a high-stakes gamble against Mother Nature. The fallout from losing that bet can be severe, turning a simple off-season task into a season-ending repair bill. Think of proper winterization not as a chore but as the single most important investment you can make in your boat's longevity and value.
Why Water is Your Engine's Winter Enemy
The problem boils down to simple physics. When water freezes, it expands by roughly 9%. That expansion exerts an incredible amount of force on anything containing it. Inside your engine's intricate cooling passages, that force is easily powerful enough to crack a cast-iron engine block or exhaust manifold, turning a reliable powerplant into a useless chunk of metal.
Failing to properly winterize can lead to some seriously expensive repairs. The global boat repair market shot up 7.6% from 2020 to 2021, hitting a staggering $6.81 billion. A huge chunk of that was driven by simple neglect during the off-season. Marine surveys consistently show that 25-30% of boats stored improperly over the winter suffer corrosion or gasket failures, with an average repair cost of $2,500 to $5,000 per incident.
Beyond the catastrophic cracks, other issues are silently brewing:
- Fuel System Corrosion: Untreated ethanol-blended fuel is notorious for absorbing moisture from the air, which leads to phase separation. This process leaves a corrosive sludge of water and ethanol at the bottom of your tank, ready to destroy fuel lines, injectors, and carburetors.
- Internal Rust: Condensation can easily form inside the cylinders, causing rust to form on the cylinder walls and piston rings. This damage leads to poor compression and a major loss of performance when you finally try to start up in the spring. If you've ever dealt with a rough start, you might be interested in our guide on identifying critical outboard engine sounds, which can help diagnose these kinds of issues.
Winterization Risks vs Rewards
To put it in perspective, let's look at the trade-offs. The small upfront cost and effort of winterizing your boat pale in comparison to the potential financial hit and lost time on the water from neglect.
| Action | Consequence of Neglect (The Risk) | Benefit of Proper Care (The Reward) |
|---|---|---|
| Cooling System | A cracked engine block or manifold from freezing water, costing thousands to repair or replace. | Complete protection from freeze damage and a reliable startup in spring. |
| Fuel System | Corroded fuel lines, clogged injectors, and a damaged carburetor from phase separation. | A clean, stable fuel system that fires right up without hesitation. |
| Engine Internals | Rusted cylinder walls and piston rings, leading to lost compression and poor performance. | Cylinders and pistons are coated and protected, ensuring maximum power and longevity. |
| Overall Cost | Average repair bills of $2,500 to $5,000, plus a ruined start to the boating season. | A small investment in supplies ($50 - $150) and a few hours of your time. |
The math is simple. The risks just aren't worth the reward of "saving" a few hours one afternoon in the fall.
The Smart Investment
The best way to tackle this is with a clear plan and the right supplies. Using high-quality marine antifreeze, a reliable fuel stabilizer, and the correct fogging oil is completely non-negotiable.
Think of it this way: spending a small amount on premium winterization products from a trusted source like MacombMarineParts.com is like buying an insurance policy against a multi-thousand-dollar repair bill.
Sourcing everything from a specialized marine supplier like MacombMarineParts.com ensures you're using products specifically designed to protect your engine type. It’s the first and most critical step toward a successful winter layup and a hassle-free launch next season.
Your Essential Winterization Toolkit
Before you even think about turning a wrench, a smooth winterization job starts with having all your gear laid out and ready to go. There’s nothing more frustrating than getting halfway through the job only to realize you’re missing the right oil filter or a can of fogging oil. Think of this as your battle plan—get everything in one place, and you'll get it done right the first time.
Having the correct, high-quality supplies is non-negotiable. Using the wrong stuff is just as bad as not doing the job at all. For instance, dumping automotive antifreeze into your engine instead of marine-grade propylene glycol can poison the waterways and will absolutely wreck your engine's seals and impeller. Quality matters.
That’s why you should always purchase your winterization supplies from MacombMarineParts.com. They carry the brands we trust, like Quicksilver and Sierra, plus OEM parts, so you know you’re getting exactly what your engine was designed to use.
Fuel System Essentials
First up is treating your fuel. The whole point here is to stop the gasoline from breaking down and gumming up your carburetor or injectors during the long layup.
- Fuel Stabilizer: This is arguably the most important bottle you'll buy. You need a marine-specific formula designed to fight the corrosive effects of ethanol. Quicksilver Quickstor or Sierra Fuel Stabilizer are excellent choices you can find at MacombMarineParts.com. You'll add this to your tank right before the final run of the season.
- Full Tank of Fuel: It’s a classic rule of thumb for a reason: store your boat with the tank about 95% full. This leaves very little room for air, which means less condensation (water) can form inside your tank over the winter.
Cooling System Protection
This is the heart of winterization—protecting your engine block from the catastrophic damage that freezing water can cause.
- Marine Antifreeze (Propylene Glycol): You’ll need a few gallons of this non-toxic, pink antifreeze from MacombMarineParts.com. How much depends on your engine, but it's always smart to buy an extra gallon. Look for a -50°F or -100°F rating; the lower temp rating gives you an extra margin of safety in really cold climates.
- Engine Flusher ("Muffs"): For nearly all outboards and sterndrives, you need a good set of "muffs" that clamp over the water intakes and connect to a garden hose. This is how you'll run the engine on land.
- A 5-Gallon Bucket: You'll use this to mix your antifreeze and circulate it through the engine without making a mess or wasting gallons of the pink stuff.
Oil and Lubrication Supplies
An oil change is a must. Old, used oil is full of acidic contaminants that you don't want sitting in your crankcase all winter long.
One of the most common mistakes we see is boaters leaving old, acidic oil in the engine all winter. It slowly etches bearings and other critical surfaces. Fresh oil is one of the best things you can do for long-term engine health. If you're new to this, we have some great tips on making easy oil changes with a Johnson Pump that can really simplify the process.
Here’s your shopping list from MacombMarineParts.com for the lube job:
- Engine Oil: Check your manual for the correct weight, like a 25W-40, and always buy quality marine-grade oil.
- New Oil Filter: Don't ever change the oil without changing the filter. You can find the exact part number for your engine on MacombMarineParts.com.
- Oil Extractor Pump: Most marine engines don't have a drain plug on the oil pan. You’ll need a pump to suck the old oil out through the dipstick tube.
- Gear Lube and Pump: If you have an outboard or sterndrive, the lower unit gear lube needs to be drained and replaced. A simple pump that screws onto the lube bottle makes this job a thousand times cleaner.
- Fogging Oil: This special aerosol oil gets sprayed directly into the engine’s air intake while it's running. It coats the cylinders, pistons, and rings to prevent any internal rust from forming.
- Grease Gun and Marine Grease: You'll need this to hit all the zerk fittings on your steering components, throttle cables, and other pivot points.
Winterizing Inboard and Sterndrive Engines
Inboard and sterndrive engines, or I/Os as many of us call them, are the true workhorses of the water. But that powerful design makes them a prime target for freeze damage. Unlike an outboard that self-drains, their cooling systems are more complex, trapping water in places you can't see. Methodically winterizing your inboard isn't just a good idea—it's absolutely critical to protect your investment.
The whole game plan is to chase every last drop of raw water out and replace it with marine-grade antifreeze. You'll run the engine, stabilize the fuel, change the oil, and then carefully drain and fill the cooling block. It sounds like a lot, but with the right gear from MacombMarineParts.com and a clear process, it's a job any boat owner can tackle.
This visual guide breaks down the three core pillars of a solid engine winterization.
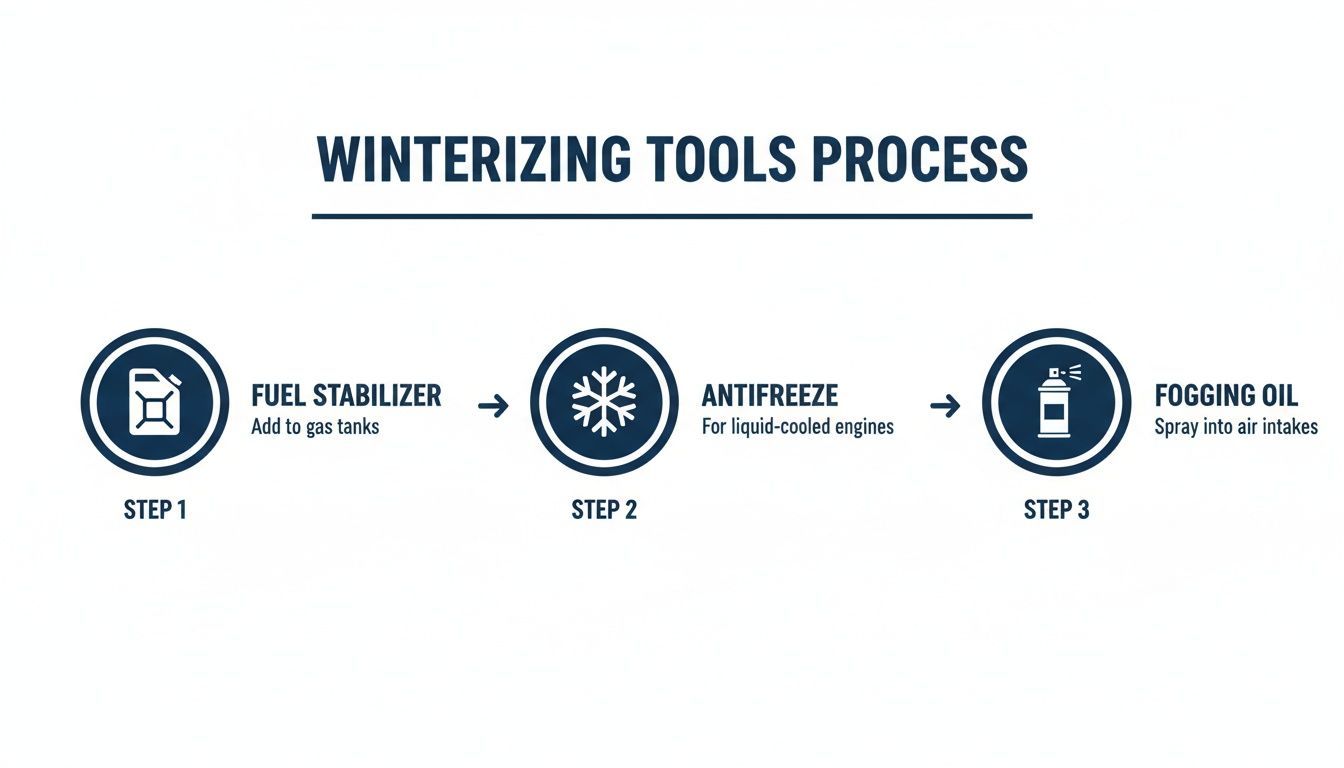
This workflow shows you exactly what you need—fuel stabilizer, antifreeze, and fogging oil—to shield your engine's most important systems from a long, cold winter.
Stabilizing Fuel and Changing Oil First
Always start with the fuel. Before you even think about your last trip of the season, pour a quality marine fuel stabilizer into your tank, following the directions on the bottle. Then, get the boat out on the water and run it for at least 15-20 minutes. This isn't just for fun; it's to make sure that treated fuel gets pulled all the way through the lines, filters, and into the injectors or carburetor.
Once the engine is nice and warm from that final run, it's the perfect time to change the oil and filter. Warm oil is thinner and flows out much easier, making the extraction process cleaner. Getting that old, acidic oil out is crucial. Leaving it in all winter lets contaminants and moisture corrode internal components from the inside out. You can find the exact oil filters for your Mercruiser, Crusader, or Volvo Penta engine right here at MacombMarineParts.com.
Leaving used oil in your engine all winter is like leaving a wet, acidic sponge inside your crankcase. The contaminants slowly etch away at bearings and other precision surfaces. A fresh oil change is one of the single best preventative maintenance tasks you can perform.
Flushing and Draining the Raw Water System
This is where you directly fight back against freeze damage. The mission is simple: get every drop of lake, river, or ocean water out of the engine block and exhaust manifolds.
First, you’ll need to run the engine on the trailer. Grab a set of engine flushers—often called "muffs"—and connect them to a garden hose. Clamp them securely over the raw water intakes on your sterndrive's lower unit. If you have a true inboard, you might need a specific flush kit that plumbs into the raw water intake hose.
With water flowing, fire up the engine and let it run for a few minutes until it hits normal operating temperature. You're waiting for the thermostat to open up, which allows fresh water to circulate through the entire engine. Once it's warm, shut it down and get ready to drain.
- Find Your Drain Plugs: Every engine is a little different, but you'll typically find drain plugs on the sides of the engine block, at the bottom of the exhaust manifolds, and on the main water circulating pump housing.
- Pull the Plugs: Carefully remove each one. Don't be surprised if nothing comes out at first. It's smart to poke a thin wire or a small screwdriver into the holes to break up any rust flakes or sediment that’s blocking the flow.
- Be Patient: Let it drain completely. Don't rush this step. Even a small amount of trapped water can crack a manifold when it freezes.
If you're unsure where every plug is, a parts diagram is your best friend. For example, exploring a Volvo Penta parts diagram can show you the exact location of every single drain you need to open.
Filling with Marine Antifreeze
With the system bone-dry, it's time to introduce the antifreeze. Make sure you're using a non-toxic propylene glycol marine antifreeze, which you can purchase at MacombMarineParts.com. Never use automotive (ethylene glycol) antifreeze; it's incredibly toxic to aquatic life and will get you in big trouble if it spills.
A simple and effective method involves a 5-gallon bucket and a short piece of hose.
- First, thread all the drain plugs back in and tighten them up.
- Find the main raw water intake hose inside the boat and disconnect it from its seacock.
- Stick the end of that hose into your bucket, which should have 3-5 gallons of fresh marine antifreeze.
- Start the engine. It will immediately begin sucking the pink antifreeze from the bucket into the cooling system.
- Keep your eyes on the exhaust outlets. As soon as you see pink antifreeze spitting out, the system is full. Let it run for another 30 seconds just to be sure, then shut the engine down for good.
This single process protects your engine from its biggest threat. When you consider that up to 75% of engine failures can be traced back to cooling system issues, this step is non-negotiable. Properly filling the system with antifreeze, which typically protects down to -50°F, prevents the vast majority of these costly headaches.
Fogging the Cylinders
Your last step, while the engine is running on that antifreeze, is to "fog" the cylinders. As the engine idles, spray fogging oil directly into the carburetor or throttle body air intake. You'll see the engine start to bog down and produce a thick cloud of white smoke—that's exactly what you want.
Keep spraying a liberal amount of oil until the engine chokes and stalls. This coats the cylinder walls, piston rings, and valves with a protective film of oil, stopping condensation from causing rust and corrosion over the long layup. With that, your inboard engine is officially tucked in and ready for its winter nap.
A Complete Walkthrough for Outboard Engines
Whether you're running a small tiller or a monster V8, your outboard has its own specific needs when it comes to winter layup. People often think that because outboards are designed to self-drain, they can just park them for the winter. That's a huge mistake. A proper winterization is absolutely critical to head off corrosion, fuel system nightmares, and serious mechanical failures down the road.
This guide walks you through the whole process, step-by-step, just like a seasoned mechanic would do it.
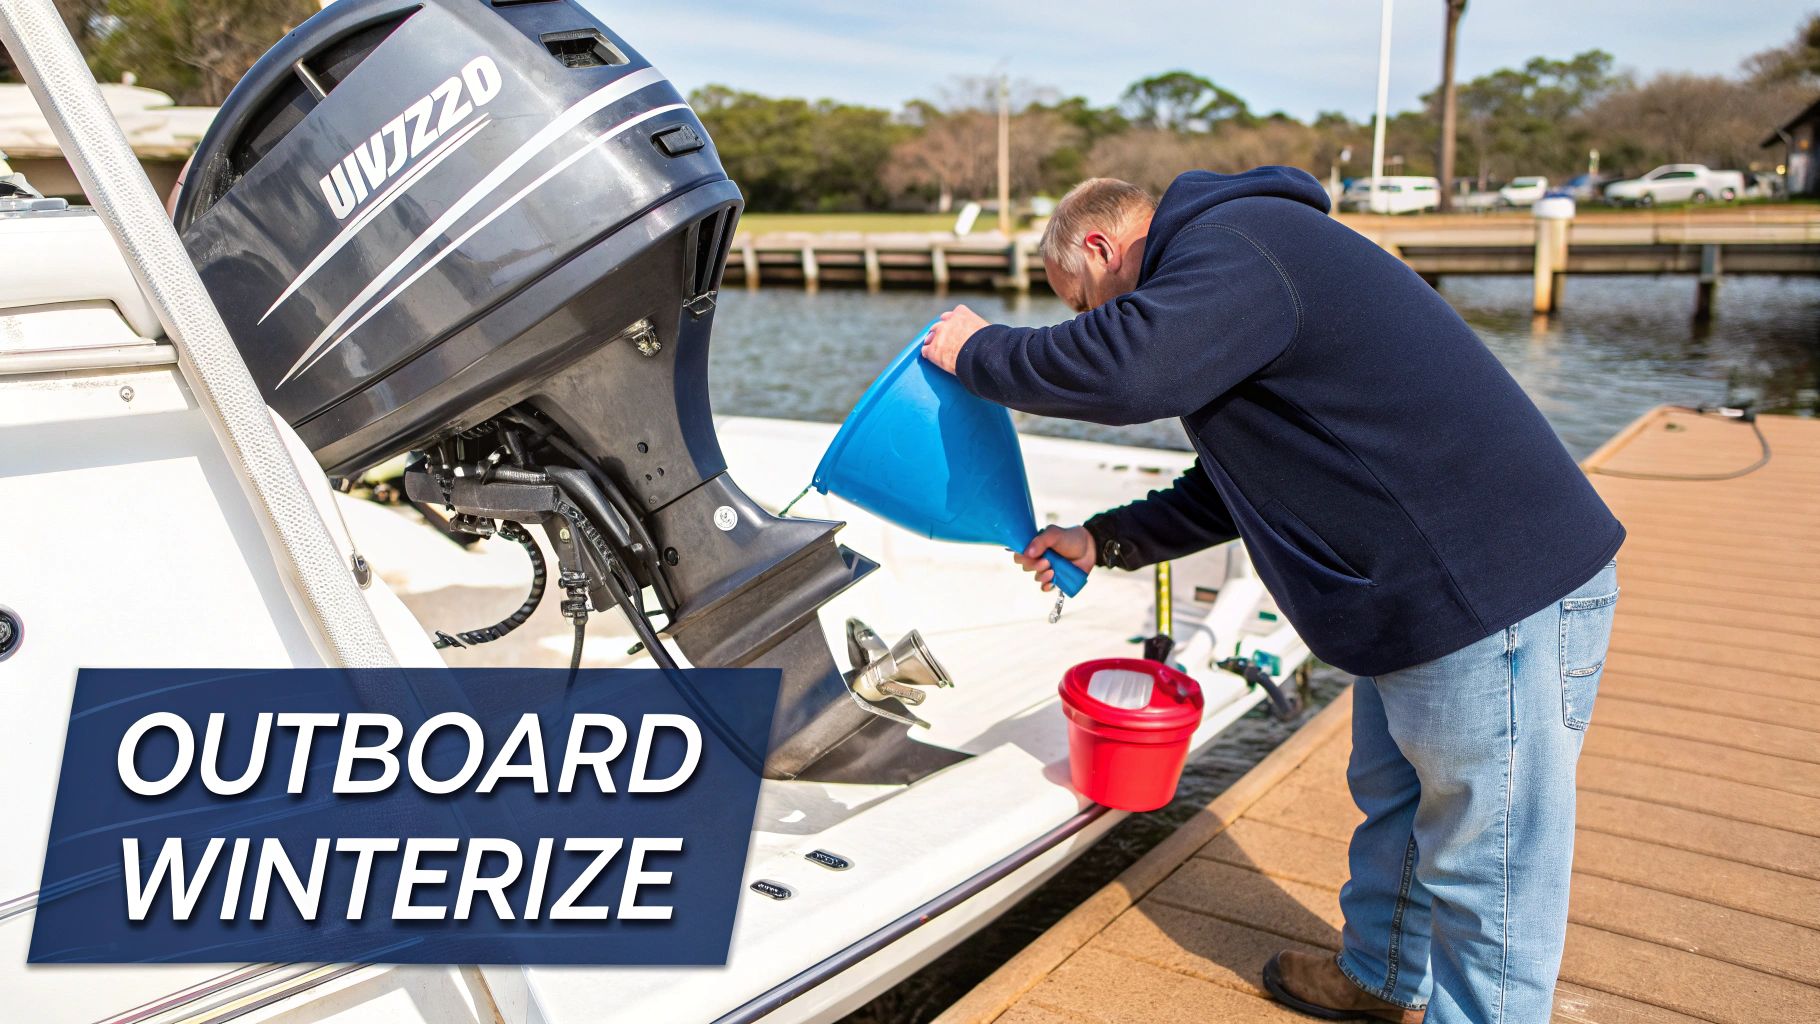
We'll start with a thorough freshwater flush, move on to stabilizing the fuel and fogging the cylinders, and wrap up by changing the lower unit gear oil—a simple task that can tell you a lot about the health of your engine.
Start with a Freshwater Flush
First thing's first: you have to get all the salt, silt, and junk out of the engine's cooling passages. Every time you run your boat, raw water leaves behind corrosive deposits that will happily eat away at the internal metal components all winter long. A good flush is your best defense.
You'll need a set of engine "muffs" to connect a garden hose. You can get a quality set from MacombMarineParts.com. Clamp them securely over the water intake vents on the lower unit, turn on the water, and make sure you've got solid pressure before you even think about turning the key.
Let the engine run at a fast idle for 5 to 10 minutes. This gives it enough time to warm up and for the thermostat to open, guaranteeing that fresh water circulates through the entire powerhead, not just the lower passages.
Treat the Fuel System and Fog the Engine
While the engine is still running on the muffs, you can knock out two jobs at once: stabilizing the fuel and fogging the cylinders. The goal here is to run the outboard completely out of fuel while simultaneously coating its internal parts with a protective layer of oil.
A small, portable 3-gallon fuel tank is your best friend for this job. Create a special winterizing cocktail: mix a little bit of gas with a high-quality marine fuel stabilizer (we like Quicksilver Quickstor from MacombMarineParts.com) and a shot of 2-stroke outboard oil—yes, even if you have a 4-stroke. That extra oil is what's going to fog the engine.
Here’s the process:
- Disconnect your boat's main fuel line from the engine.
- Hook up your small tank with the treated fuel mix.
- Let the engine run on this special blend. The stabilizer will make its way through the entire fuel system, protecting everything from the fuel pump to the injectors from getting gummed up.
- As the tank runs dry, the engine will start to sputter. Right before it dies, spray a liberal amount of dedicated fogging oil directly into the air intake(s). The engine will cough out a big cloud of white smoke and then stall. This ensures the cylinders, pistons, and rings get a thick coating of oil to prevent rust from forming as condensation builds up over the winter.
Change the Lower Unit Gear Oil
This is a step you cannot skip. It’s not just maintenance; it’s one of the most important diagnostic checks you can perform all year. The condition of your gear lube tells you everything you need to know about the seals protecting your lower unit.
Get a drain pan under the lower unit and remove both the upper (vent) and lower (drain) screws. Let all the old, dark oil drain out completely. Now, take a close look at it.
Insider Tip: If that gear lube looks milky, like coffee with way too much cream, you've got a problem. That means water has gotten past your driveshaft or propeller shaft seals. You must get this fixed before storage. If you don't, any trapped water will freeze, expand, and crack your gearcase—a brutally expensive repair.
Once it's empty, it's time to refill. You'll need a gear lube pump, which screws right onto the bottle. We always recommend a top-tier product like Quicksilver Premium Gear Lube, available at MacombMarineParts.com. Connect the pump to the lower drain hole and pump fresh lube in until you see it start oozing out of the top vent hole. Quickly put the top screw back in first, then the bottom one. This creates a vacuum and keeps the mess to a minimum.
For a more detailed breakdown, check out our guide on how to do an outboard lower unit oil change.
Final Lubrication and Storage Position
Last up, grab a grease gun loaded with good marine grease from MacombMarineParts.com and hit every zerk fitting you can find. Pay close attention to the steering tube, tilt mechanism, and any other pivot points. A little grease now prevents a lot of seizing later.
Finally, trim the outboard all the way down into the vertical position for storage. This is the single best way to ensure every last drop of water drains out of the cooling passages, giving you the ultimate protection against a sudden freeze.
Final Checks for Long Term Winter Storage
Alright, you’ve done the heavy lifting. The fuel system is stable, the cooling passages are protected, and the engine internals are fogged and ready for a long winter’s nap. But don't put the cover on just yet.
Knowing how to winterize the engine is only half the battle. These final checks are what separate a smooth spring launch from a season opener filled with nasty surprises. Think of this as the final walk-around—the last line of defense against electrical gremlins, corrosion, and pests.
Securing the Electrical System
Leaving your battery hooked up all winter is a guaranteed way to kill it. Even when everything is switched off, a slow parasitic drain will sap its life away, leaving you with a paperweight in the spring.
Simply disconnecting the battery averts an estimated 15% of parasitic drain losses that happen over a few months of storage. Doing this alone can add another 2 to 3 years to your battery's life, saving you a few hundred bucks in the long run.
The best move is to pull the battery out of the boat completely.
- Store it properly: Keep it in a cool, dry spot like a garage or basement. Just make sure it's not sitting directly on a concrete floor—a simple piece of wood or plastic underneath will do the trick.
- Keep it charged: Hook it up to a quality smart battery maintainer. A trickle charger works, but a modern maintainer is better because it won't overcharge the battery, which is key to its longevity.
If taking the battery out isn't an option, at the very least, make sure it’s fully charged and then disconnect the negative terminal. That will stop any sneaky power drains in their tracks.
Inspecting Sacrificial Anodes
Sacrificial anodes are your boat's unsung heroes. These small, cheap chunks of zinc or aluminum are designed to corrode so your expensive sterndrive, trim tabs, and propeller don't have to. The off-season is the perfect time to give them a look.
If your anodes are heavily pitted or look like they're more than 50% dissolved, they've done their job and need replacing. Don't put it off. Once the anode is gone, the surrounding metal components are next on the menu for galvanic corrosion. You can find the exact replacement anodes for your engine and drive over at MacombMarineParts.com.
A sacrificial anode is like a bodyguard for your boat's expensive metal parts. When it sacrifices itself, your drive unit lives to see another season. Replacing a $20 anode can save you from a $2,000 drive repair.
Managing Moisture and Pests
Nothing is worse than pulling back the cover in spring to find a science experiment of mildew and critter nests. First, get the bilge bone-dry. Use a sponge or wet vac to suck out every last drop of water. A dry bilge means no mildew and no foul odors.
Next, it’s time to evict any uninvited winter guests like mice and spiders.
- Remove all food: Every last crumb, wrapper, and can has to go. An empty chip bag is an open invitation for rodents.
- Clean upholstery: Give all cushions and storage compartments a thorough cleaning.
- Use deterrents: Scatter some mothballs, peppermint oil-soaked cotton balls, or commercial pest repellents in compartments and throughout the cabin.
Finally, make sure your boat cover is pulled tight and properly ventilated. A good cover keeps the snow and rain out, but it has to be able to breathe. Trapped moisture is mildew's best friend. For bigger boats, it's worth the effort to learn more about shrink wrapping a pontoon boat. It creates an unbeatable barrier against winter weather while still allowing for proper airflow.
Common Questions About Winterizing Boat Engines
Even after walking through the entire process, it's normal to have a few questions pop up. When you're learning how to winterize a boat engine, getting straight answers is the only way to protect your investment and avoid a really expensive mistake down the road. We've pulled together some of the most common questions we hear from boaters just like you to help clear things up.
Can I Use Car Antifreeze in My Boat Engine?
This is a big one, and the answer is an absolute, unequivocal no. Standard automotive antifreeze is made with ethylene glycol, which is incredibly toxic to fish and any other aquatic life. Pumping that into a waterway is not only illegal but a huge environmental no-go.
For your boat, you have to use a non-toxic, propylene glycol-based marine antifreeze. This is the "pink stuff" you see in every marina. It's specially formulated for boat engines, so it won't damage your seals or impeller, and it's safe for the environment. You can grab the right marine-safe antifreeze from trusted brands like Sierra over at MacombMarineParts.com to make sure you're doing the job correctly and responsibly.
What Is Engine Fogging and Is It Actually Necessary?
Engine fogging is a simple but critical step. It involves spraying a specially formulated oil directly into the engine’s air intake while it’s running, just moments before you shut it down for the last time. This spray turns into a fine mist that coats all the important internal metal surfaces—think pistons, cylinder walls, and bearings—with a thin, protective film of oil.
So, is it necessary? You bet it is. During the winter, those big temperature swings create condensation inside your engine. Without that oily coating, moisture sits directly on the metal, leading straight to rust and corrosion. That can cause seized piston rings or even worse internal damage. Think of fogging as a cheap and easy insurance policy against a massive repair bill come springtime.
Do I Still Need to Winterize in a Mild Climate?
Even if you live somewhere the thermometer rarely drops below freezing, going through most of the winterization checklist is still a smart play. Corrosion doesn’t care about the temperature—it's a year-round threat. Untreated fuel will still break down, and condensation can still form inside your engine and fuel tank.
At the very least, you should always stabilize your fuel, change the engine oil and filter, and fog the cylinders. You might get away with skipping the full antifreeze flush in a truly frost-free climate, but these other storage steps are vital for protecting your engine's health and making sure it fires right up when boating season rolls around again.
This isn't just theory. Commercial operators and boat rental fleets have found a 25% reduction in engine breakdowns and springtime maintenance headaches just by sticking to a strict winterization plan that includes stabilizing fuel and fogging cylinders. You can explore the full findings on the leisure boat engine market to see the data for yourself.
How Often Should I Replace the Water Pump Impeller?
That little rubber water pump impeller has a huge job—it's literally the heart of your engine’s cooling system. The general rule from most manufacturers is to replace it every two years or every 200 hours of use, whichever comes first.
The absolute best time to replace your impeller is during your fall winterization. This proactive step ensures you start the next season with a fresh, pliable impeller, eliminating the risk of a mid-season failure that could lead to catastrophic engine overheating.
Finding the right part is simple. You can look up the exact impeller for your engine model on MacombMarineParts.com, making this critical task an easy addition to your fall routine.
For all your winterization needs—from the right antifreeze and fuel stabilizer to the specific impeller for your engine—trust the experts at MacombMarineParts.com. Find every OEM and quality aftermarket part you need to get the job done right at https://macombmarineparts.com.